Set Number of Lines - Invoice Manager for Excel
Summary
This tool adds or deletes the lines on the itemized detail section of the "Invoice", "Quote", and "Purchase Order" sheets so that the sheets have the number of lines you specified.
This tool works for regular forms only.
"Regular form" means each column on the Excel sheet maps to a different database field, and each column has the same number of valid lines. For example, if a "Quote" sheet has two "Product ID" columns, it is not a regular form (because two columns on the sheet map to the same database field).
How do I change the number of lines?
- Open your template as usual.
- Go to the "Invoice" ribbon tab.
- Click the "Tools" button, and then the "Set the Number of Lines on the Detail Section" button. This shows the dialog window below.
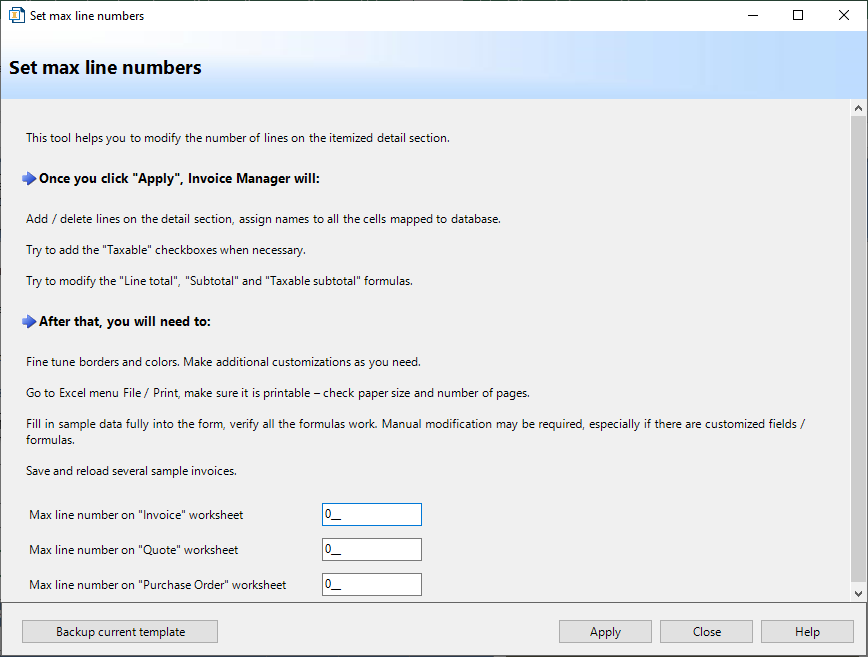
- Fill in the number of lines you want on each sheet.
If an entry is 0 (zero), Invoice Manager will try to detect the max line number on the fly when you click "Clear & New" and "Save to DB".
If a sheet, such as "Quote", is missing from your template, the corresponding text box is disabled.
- Click the "Apply" button.
Fine-tune the modified sheets
The template is in design mode once the automated modifications are done. You may need to do one or more of the following steps to make the form look elegant:
Add or remove borders; set background colors
- Right-click the cell you want to modify.
- Choose "Format cells" from the shortcut menu.
- To set the background color, go to the "Patterns" tab; to add or remove borders, go to the "Borders" tab.
Delete form button and checkboxes
If you add new lines, Invoice Manager adds "Taxable" checkboxes and links them to the correct "oknTaxable_linenumber" cells automatically if the existing checkboxes are Excel form controls.
If your template is very old (before 2014) and the checkboxes on your sheet are ActiveX controls, it will not replicate those controls. In this case, you can send us your template for an update.
If you delete lines from the sheet, Invoice Manager deletes the corresponding "Taxable" and "Select a product or item" buttons too. However, if the taxable boxes are not correctly named, the deletion fails. In this case, you need to delete the unwanted controls manually.
To delete a control from the sheet, right-click the border of the control and then choose "Delete" from the shortcut menu.
Make sure the template is printable
Click the Excel menu File / Print to preview the print result of the sheet. This also shows how the PDF document will look. Make sure the form is printable on the number of pages you desire. Make sure you preview each of the sheets that you use: invoice, quote, and purchase order.
If you add a few new lines and the sheet is longer than you want, there are several ways to reduce the number of pages it requires.
- Modify the top, bottom, page header, and page bottom margins. Do this using the Page setup dialog box. See more samples on this topic here.
- Modify line heights.
To do this, drag the mouse on the row headings to select all lines, right-click one of the selected row headings, and choose "Line height". You can also do this for the lines on the top or bottom of your sheet.
If you delete a few lines from the sheet, you can also modify the line heights to make the form look elegant.
Test the template
Invoice Manager modifies the key formulas to reflect the new number of lines. These include the line total cells, subtotal, and taxable subtotal. If your template is a customized version, or if you added custom fields and applied new formulas, a thorough and comprehensive test is required before production usage.
To do this test, first exit design mode and then fill in all the fillable data cells. Carefully review the result of each calculable cell.
It is also necessary to save and reload invoices, quotes, and purchase orders to make sure the form works correctly.
- Fill in all the data on the sheet.
- Click "Save To DB" to save it to the database.
- Click "Invoices" (or "Quotes" or "Purchase Orders") on the "Invoice" ribbon tab, click and select the entry you saved, and then click "Edit In Excel".
- Make sure the result meets what you entered on the sheet.